stav is lost logo
  • Find Hikes
    • Most recent
    • Trip Report Index
    • Hikes by Region
    • Search Hikes
  • Map
  • About
  • Love
Canyoneer Devil's Drain Canyon Loop in Lake Mead National Recreation Area, Nevada - Stav is Lost

Canyoneer Devil's Drain Canyon Loop Lake Mead National Recreation Area, NV

Class 3 3A III (140 ft max) 8.6 miles 1800 gain 6-8 hrs Loop
Effort
Beauty
Personality
Solitude
DirectionsRoute MapDownload GPX

Devil's Drain Canyon Loop GPX Track

I will always provide a free route map, but you can also download a hike/drive GPX to assist you and to help support my site. Before sharing my GPX tracks with others, please remember my site is a free resource and I'm charging nominal fees to offset my substantial costs.

GPX track added to your cart.

Add to Cart ($2.50)
View Cart
This is a technical canyon. If you are unfamiliar with how to build anchors or the gear required for canyoneering do not attempt this route.

Jan 12, 2020 — Devil's Drain Canyon was a long-awaited technical canyon in Lake Mead. I met up with a couple of new friends (Sarah and Tim), and got Adam and Frances away from peakbagging for a day of canyon fun. A couple of years ago, I hiked down to Moonscape Hot Springs via a non-technical route. This loop is a great technical addition to that route.

A couple of really burly vehicles could serve as a shuttle to shave about a mile off this hike, but we hoofed it from the junction of Canyon Point Road and Canyon Point Mesa Road, heading north onto a mesa with increasingly pretty views toward the Black Canyon as we progressed. The mesa slowly curved east and became more narrow, eventually appearing like it would drop off completely. However, a Class 3 scramble continued east along the rim down toward a crumbly-looking yellow dirt saddle. Although very steep, there weren't any surprise moves during the scramble and the exposure is minimal. Once at the yellow saddle, we began a slightly aggravating descent on the steep, loose slope heading south. You'll notice the yellow-colored dirt features end at a small and jagged cliff, and below this cliff is black volcanic rock again. We followed the rim of this cliff and stumbled on the first rappel. You can easily bypass this rappel by continuing down the loose slope rather than following the cliff rim, but it's the highlight rappel of Devil's Drain, the drain itself! There are two holes in the feature, the smaller one being the fun little hole to rappel through.

There was a minor partner-assist obstacle just before the biggest rappel of the day. This second rappel gave me a bit of vertigo. It's a two-tiered rappel, but we did it in one shot without issues pulling the rope. Another big rappel followed shortly after, and then the technical stuff was over for the day.

We continued down Devil's Drain Canyon, some Class 2/3 obstacles leading through really pretty scenery before entering a short section of narrows. Just after the cliffs opened up, the sounds of a spring meant ample water for brush in the canyon. Fortunately, most of the brush can be avoided by keeping to a social trail on the left, but eventually it was unavoidable as the canyon narrowed up again. I recommend just staying in the watercourse once this happens. Our attempts to avoid it via the slopes and cliff faces didn't save any time. The algae and colors within the watercourse are nice and the brush had minimal prickliness. We made it to the top of a warm waterfall, which we bypassed on the right via a Class 3 scramble. Below the waterfall is a sandy wash and easy walking to Moonscape Hot Spring. We hung out for a bit before realizing how late it was getting and continued east toward the Colorado River.

About halfway between the waterfall and the Colorado River is a side canyon on the right, which would serve as our ascent route. This canyon is known as Emerald Pools Canyon. It's got some really pretty features, including a small section of narrows, some boulder-hopping, and minor route-finding to avoid brush. When the canyon begins to open up a bit, keep to the left and cairns will mark a Class 2 route along the cliffs to avoid the brush in Emerald Pools Canyon's watercourse. Once the canyon becomes even more open, the brush peters out and the only obstacles are the occasional Class 2/3 scramble over boulders. We followed Emerald Pools Canyon to its head, where we were met by a wide section of uninteresting desert, which we traversed southwest and down into the canyon known as Weeping Spring Canyon. Heading left (east) leads to the technical route of this canyon, and right (west) leads up the long wash and finishes on the somewhat aggressive Class 2/2+ talus field ascent to Canyon Point. Watch out for broken glass as you near the rim. We followed the road back to where we parked.

Show me some love

Please consider helping me out if you find my site useful. I'm not sponsored, so all site fees are out-of-pocket and my time preparing these trip reports is unpaid. You can also hire me as a web developer. I really appreciate it!

Thank you

Next HikePrev Hike
  • Next Hike
  • More Near Here
  • Prev Hike
photo protector Heading north from the junction of Canyon Point Road and Canyon Point Mesa Road. We followed the mesatop for a long time, our goal the yellow eroded-looking saddle right of center.
Heading north from the junction of Canyon Point Road and Canyon Point Mesa Road. We followed the mesatop for a long time, our goal the yellow eroded-looking saddle right of center.
photo protector Close-up into Devil's Drain Canyon below.
Close-up into Devil's Drain Canyon below.
photo protector Descending the steep Class 3 at the end of the mesatop, where the route became a ridge.
Descending the steep Class 3 at the end of the mesatop, where the route became a ridge.
photo protector Class 3 along the ridge as we descend to the yellow saddle below. The first rappel (the devil's drain) is found toward the end of the yellow jagged-looking cliff on the right.
Class 3 along the ridge as we descend to the yellow saddle below. The first rappel (the devil's drain) is found toward the end of the yellow jagged-looking cliff on the right.
photo protector Descending Class 3.
Descending Class 3.
photo protector Class 3 descent. Tim seen center at the spot where we would descend off the ridge.
Class 3 descent. Tim seen center at the spot where we would descend off the ridge.
photo protector Last view at a Class 3 move along the rim descent.
Last view at a Class 3 move along the rim descent.
photo protector Awful, loose stuff leading down from the ridge. Keep to the yellow rim to reach the first rappel. You can skip the
Awful, loose stuff leading down from the ridge. Keep to the yellow rim to reach the first rappel. You can skip the "devil's drain" rappel by just scrambling down Class 2 talus in the center of this photo.
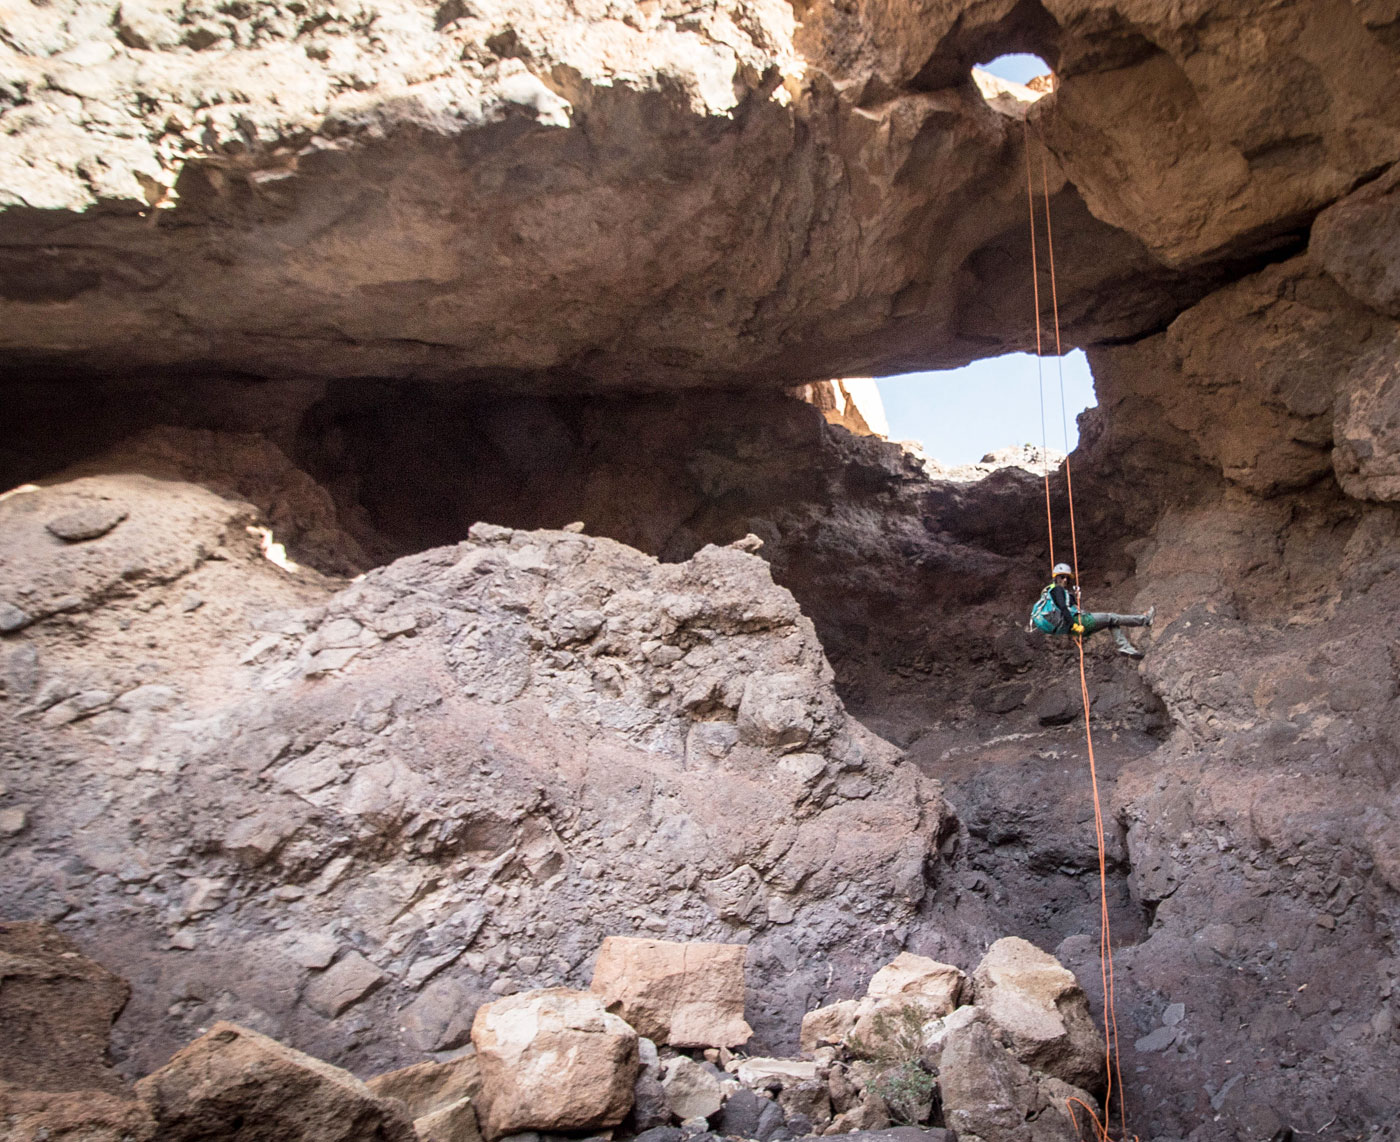
photo protector The Devil's Drain.
The Devil's Drain.
photo protector Friends prepping for the rappel.
Friends prepping for the rappel.
photo protector Through the drain.
Through the drain.
photo protector Bottom of the drain, view toward the little hole.
Bottom of the drain, view toward the little hole.
photo protector Short rappel or partner-assist.
Short rappel or partner-assist.
photo protector Big second rappel.
Big second rappel.
photo protector Close-up of the drop.
Close-up of the drop.
photo protector View back toward the second rappel.
View back toward the second rappel.
photo protector Final, third rappel.
Final, third rappel.
photo protector View back toward the third rappel.
View back toward the third rappel.
photo protector Continuing down Devil's Drain Canyon.
Continuing down Devil's Drain Canyon.
photo protector Fun Class 2/3 obstacles as we continue down the canyon.
Fun Class 2/3 obstacles as we continue down the canyon.
photo protector Relatively lush stuff.
Relatively lush stuff.
photo protector The canyon began to open a bit and introduced a bit of brush.
The canyon began to open a bit and introduced a bit of brush.
photo protector We avoided the majority of the brush by keeping to the left of the watercourse at first.
We avoided the majority of the brush by keeping to the left of the watercourse at first.
photo protector But eventually it was easier to just stay within the watercourse and do some light bushwhacking.
But eventually it was easier to just stay within the watercourse and do some light bushwhacking.
photo protector Plus, the watercourse was pretty.
Plus, the watercourse was pretty.
photo protector Cool algae and whatnot.
Cool algae and whatnot.
photo protector No caption.
photo protector Warm waterfall, avoidable via Class 3 downclimb, pictured here.
Warm waterfall, avoidable via Class 3 downclimb, pictured here.
photo protector View back up Devil's Drain Canyon.
View back up Devil's Drain Canyon.
photo protector Moonscape Hot Spring.
Moonscape Hot Spring.
photo protector We continued down Devil's Drain Canyon, but didn't hike all the way down to the Colorado River due to lack of time, instead turning right into Emerald Pools Canyon.
We continued down Devil's Drain Canyon, but didn't hike all the way down to the Colorado River due to lack of time, instead turning right into Emerald Pools Canyon.
photo protector Class 2/3 boulder-hopping.
Class 2/3 boulder-hopping.
photo protector A Class 3 move within a narrow section of Emerald Pools Canyon.
A Class 3 move within a narrow section of Emerald Pools Canyon.
photo protector Class 3 move in the narrows.
Class 3 move in the narrows.
photo protector Avoiding the brushy drainage by keeping to a social trail on the south side of Emerald Pools Canyon.
Avoiding the brushy drainage by keeping to a social trail on the south side of Emerald Pools Canyon.
photo protector Eventually the social trail led back into the canyon's watercourse and we continued ascending.
Eventually the social trail led back into the canyon's watercourse and we continued ascending.
photo protector Class 2/3 osbtacles.
Class 2/3 osbtacles.
photo protector Nearing the head of Emerald Pools Canyon.
Nearing the head of Emerald Pools Canyon.
photo protector Continuing south to the head of Emerald Pools Canyon, visible ahead.
Continuing south to the head of Emerald Pools Canyon, visible ahead.
photo protector At the head of Emerald Pools Canyon, a bit of a desert stroll to reach the Weeping Spring Canyon wtercourse.
At the head of Emerald Pools Canyon, a bit of a desert stroll to reach the Weeping Spring Canyon wtercourse.
photo protector Within the Weeping Spring Canyon watercourse, heading southwest toward the Canyon Point rim. It got dark shortly after, but the route continues up the wash for a long time and then ascends some steep Class 2/3 black talus to get to the top of the rim.
Within the Weeping Spring Canyon watercourse, heading southwest toward the Canyon Point rim. It got dark shortly after, but the route continues up the wash for a long time and then ascends some steep Class 2/3 black talus to get to the top of the rim.

Show Me Some Love

If you find my site helpful, please help me replace my many broken cameras, fund my website fees (hosting, APIs, security), or just support my countless hours of work. I pay for all expenses myself, and all trip reports I post are unpaid and unsponsored, so any support is really appreciated!

If using PayPal, please select their option for "Sending to a friend" so they don't take out fees, thank you.

PayPalVenmoCash App

About  Contact  Love

© 2023 Stavros Basis.

DISCLAIMER: All activities you find on this site are dangerous. I am not responsible for anything you do in the outdoors. Please practice good ethics, and don't take any risks that put yourself or others in danger.


Thanks for visiting!

My site is free to use, but consider sending me a few bucks to help keep it running. Thanks in advance!

Sure!Nope.