stav is lost logo
  • Find Hikes
    • Most recent
    • Trip Report Index
    • Hikes by Region
    • Search Hikes
  • Map
  • About
  • Love
Hike Eardley Canyon View Peaks (Peak 5810 and Peak 5875) in San Rafael Swell BLM, Utah - Stav is Lost

Hike Eardley Canyon View Peaks (Peak 5810 and Peak 5875) San Rafael Swell BLM, UT

Class 3 7.9 miles 2300 gain 4-6 hrs Out and Back
Effort
Beauty
Personality
Solitude
DirectionsRoute MapDownload GPX

Eardley Canyon View Peaks (Peak 5810 and Peak 5875) GPX Track

I will always provide a free route map, but you can also download a hike/drive GPX to assist you and to help support my site. Before sharing my GPX tracks with others, please remember my site is a free resource and I'm charging nominal fees to offset my substantial costs.

GPX track added to your cart.

Add to Cart ($2.50)
View Cart

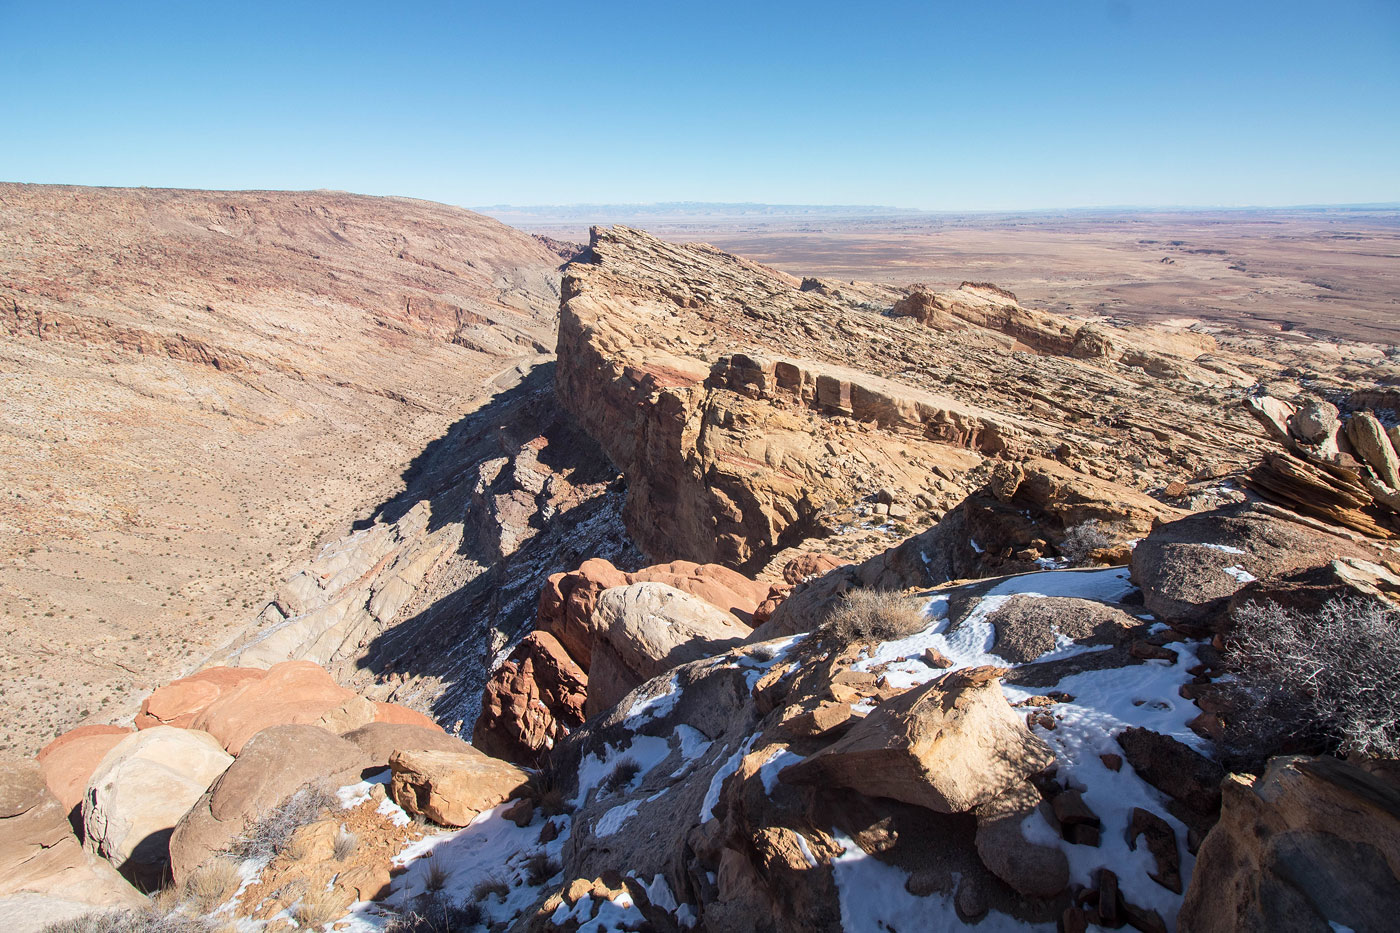
Feb 21, 2021 — This pair of unnamed peaks along the San Rafael Reef rim were the favorite of our group's two day excursion of peakbagging in the area. The slickrock route-finding was interesting, and the views were dramatic. To reach the trailhead, turn off here (38.76039, -110.4483). There was a steep section here (38.76724, -110.47737) that will cause difficulties for low-clearance.

From the trailhead, we started along a really well-defined social trail along the south side of a narrow drainage. It took me an embarasasingly long time to realize this is a technical canyon we did a few years ago called Zero Gravity Canyon. We wouldn't be repeating this technical canyon today of course, but it was fun to realize how crappy human memory can be. We continued along this social trail as it led us down into a crosshair formation of intersecting washes, taking the one that leads north. This canyon slowly increased in scrambling difficulty, the occasional Class 2 or 3 move bringing us toward its head. There were a couple of spots that may be more difficult or easier, depending on the sand build-up in a given year. The last stretch introduced some big boulders with some minor route-finding to keep the route Class 2/3.

We found ourselves on a beautiful slickrock slope leading out of the canyon, a pleasant surprise considering we thought this may require far more route-finding. We could have just been lucky in choosing this option, since many other spots for ascending could have proven impossible. The cliffs and ledges are numerous and often impassable, but our slope just sort of worked. We did have to scramble onto a higher slickrock slope when ours started to fade away, and then pull a couple of Class 2+/3 moves on ledges to navigate the maze-like slickrock terrain, but we quickly made our way to the summit of Peak 5810.

After taking in some views, we decided to continue over to Peak 5875 to the west, an obvious addition since accessing that peak would be near-impossible from another other direction. We dropped down to more mellow terrain since a traverse would have certainly included sheer cliffs. We avoided a bunch of small drainages and crevasses over this much more complex terrain than the first peak, but we were able to keep the route Class 2/3. While there weren't any exposed or difficult moves, we did have to make our way over ledges and whatnot. There's definitely more than one way, but I included what I believe was among the better options on my attached map. We liked Peak 5875 more, the views more expansive.

There was a major canyon that separated the two peaks that seemed a tempting descent route, but if there's one thing I've learned about Utah's canyon country, it's that you should never casually descend a canyon without knowing what to expect. We all agreed we would take the same route on the way back since the landscape was so complex and even a ten-foot cliff could force us to re-ascend.

PEAKS ON HIKE
Elevation (ft) / Prominence (ft)
Peaks on hike
Elevation
Prominence
1
Peak 5875
5875 ft
665 rise
2
Peak 5810
5810 ft
350 rise

Show me some love

Please consider helping me out if you find my site useful. I'm not sponsored, so all site fees are out-of-pocket and my time preparing these trip reports is unpaid. You can also hire me as a web developer. I really appreciate it!

Thank you

Next HikePrev Hike
  • Next Hike
  • More Near Here
  • Prev Hike
photo protector Starting from the trailhead.
Starting from the trailhead.
photo protector Along the rim of Zero Gravity Canyon.
Along the rim of Zero Gravity Canyon.
photo protector The trail led us to just above Zero Gravity Canyon's head, where we took the drainage visible right of center in this photo.
The trail led us to just above Zero Gravity Canyon's head, where we took the drainage visible right of center in this photo.
photo protector Sandy wash initially.
Sandy wash initially.
photo protector Class 2 boulder-hopping a bit later as we continue through the drainage.
Class 2 boulder-hopping a bit later as we continue through the drainage.
photo protector Looking back as we ascend a minor obstacle, but lower sand could mean this gets difficult.
Looking back as we ascend a minor obstacle, but lower sand could mean this gets difficult.
photo protector Looking back toward some Class 2/3 boulder navigation as we leave the drainage.
Looking back toward some Class 2/3 boulder navigation as we leave the drainage.
photo protector Our slickrock slope of choice.
Our slickrock slope of choice.
photo protector Looking back at this serendipitous slickrock slope. At a certain point this slope started to fade and we found a break in the cliffs on the right in this photo to gain the next level of slickrock slope.
Looking back at this serendipitous slickrock slope. At a certain point this slope started to fade and we found a break in the cliffs on the right in this photo to gain the next level of slickrock slope.
photo protector Ascending another slickrock slope.
Ascending another slickrock slope.
photo protector View back toward the drainage we ascended from.
View back toward the drainage we ascended from.
photo protector No caption.
photo protector View back as we ascend to Peak 5810.
View back as we ascend to Peak 5810.
photo protector Slickrock, easy terrain to Peak 5810.
Slickrock, easy terrain to Peak 5810.
photo protector View back again as we approach Peak 5810.
View back again as we approach Peak 5810.
photo protector Peak 5810 ahead, Henry Mountains visible in the distance.
Peak 5810 ahead, Henry Mountains visible in the distance.
photo protector View back again, the drainage we came out of visible right of center in this photo.
View back again, the drainage we came out of visible right of center in this photo.
photo protector Peak 5810 summit, view toward Eardley Canyon (center).
Peak 5810 summit, view toward Eardley Canyon (center).
photo protector Close-up at our route we ascended.
Close-up at our route we ascended.
photo protector Peak 5810 summit, view west along the rim. Peak 5875 is over there on the left, our next objective. Direct ridge access would be barred by a significant cliffy drainage, so we would have to descend quite far.
Peak 5810 summit, view west along the rim. Peak 5875 is over there on the left, our next objective. Direct ridge access would be barred by a significant cliffy drainage, so we would have to descend quite far.
photo protector Our ascent to Peak 5810 visible far left. From Peak 5810, we started descending toward the canyon on the right. This canyon is tempting to descend later, but I have no idea if it would go. Likely not.
Our ascent to Peak 5810 visible far left. From Peak 5810, we started descending toward the canyon on the right. This canyon is tempting to descend later, but I have no idea if it would go. Likely not.
photo protector Close-up toward the tempting canyon as we traverse over to Peak 5875.
Close-up toward the tempting canyon as we traverse over to Peak 5875.
photo protector Ascending to Peak 5875.
Ascending to Peak 5875.
photo protector Peak 5875, lot sof slickrock away.
Peak 5875, lot sof slickrock away.
photo protector A few crevasses like this one prevent easy access, requiring us to do some zig-zagging. I got cliffed out on more than one occasion, forcing a backtrack here and there. You can keep the route Class 2/3 with some micro-route-finding.
A few crevasses like this one prevent easy access, requiring us to do some zig-zagging. I got cliffed out on more than one occasion, forcing a backtrack here and there. You can keep the route Class 2/3 with some micro-route-finding.
photo protector Along the rim to the summit of Peak 5875.
Along the rim to the summit of Peak 5875.
photo protector View back just below the summit.
View back just below the summit.
photo protector Peak 5875 summit, view west along the rim.
Peak 5875 summit, view west along the rim.
photo protector Peak 5875 summit, view east toward Peak 5810. Eardley Canyon visible on the left. Also, I'd always wondered what the incredible-looking slope on the left looked like in person after seeing it on topo maps for so long - it's quite amazing.
Peak 5875 summit, view east toward Peak 5810. Eardley Canyon visible on the left. Also, I'd always wondered what the incredible-looking slope on the left looked like in person after seeing it on topo maps for so long - it's quite amazing.
photo protector View back as we ascend to Peak 5875. The temping canyon I mentioned earlier visible on the left.
View back as we ascend to Peak 5875. The temping canyon I mentioned earlier visible on the left.
photo protector Close-up toward our route, taken on the way back. We would head through the canyon visible center, up the slickrock sort of visible right of center, and up to Peak 5810, top center.
Close-up toward our route, taken on the way back. We would head through the canyon visible center, up the slickrock sort of visible right of center, and up to Peak 5810, top center.

Show Me Some Love

If you find my site helpful, please help me replace my many broken cameras, fund my website fees (hosting, APIs, security), or just support my countless hours of work. I pay for all expenses myself, and all trip reports I post are unpaid and unsponsored, so any support is really appreciated!

If using PayPal, please select their option for "Sending to a friend" so they don't take out fees, thank you.

PayPalVenmoCash App

About  Contact  Love

© 2023 Stavros Basis.

DISCLAIMER: All activities you find on this site are dangerous. I am not responsible for anything you do in the outdoors. Please practice good ethics, and don't take any risks that put yourself or others in danger.


Thanks for visiting!

My site is free to use, but consider sending me a few bucks to help keep it running. Thanks in advance!

Sure!Nope.