

Starting from the trailhead and heading into the wash tot he west, left of center.
Class 3 obstacles option. Easier way available (see map).
Within the main wash. Sugarloaf Mountain visible top right.
Narrows within the wash.
Heading up on Class 2 toward Sugarloaf Mountain, leaving the wash to go bag the peak.
Looking back along the Class 2 slope I ascended. The Class 3 obstacles wash visible on the left, the easier alternatively visible center.
Sugarloaf Mountain ahead.
Class 2/3 fun before the summit. I did som zig-zagging to find a good route through the cliffy volcanic features.
Sugarloaf Mountain summit, view south toward the Colorado River. Also visible is Lost Man Peak left of center.
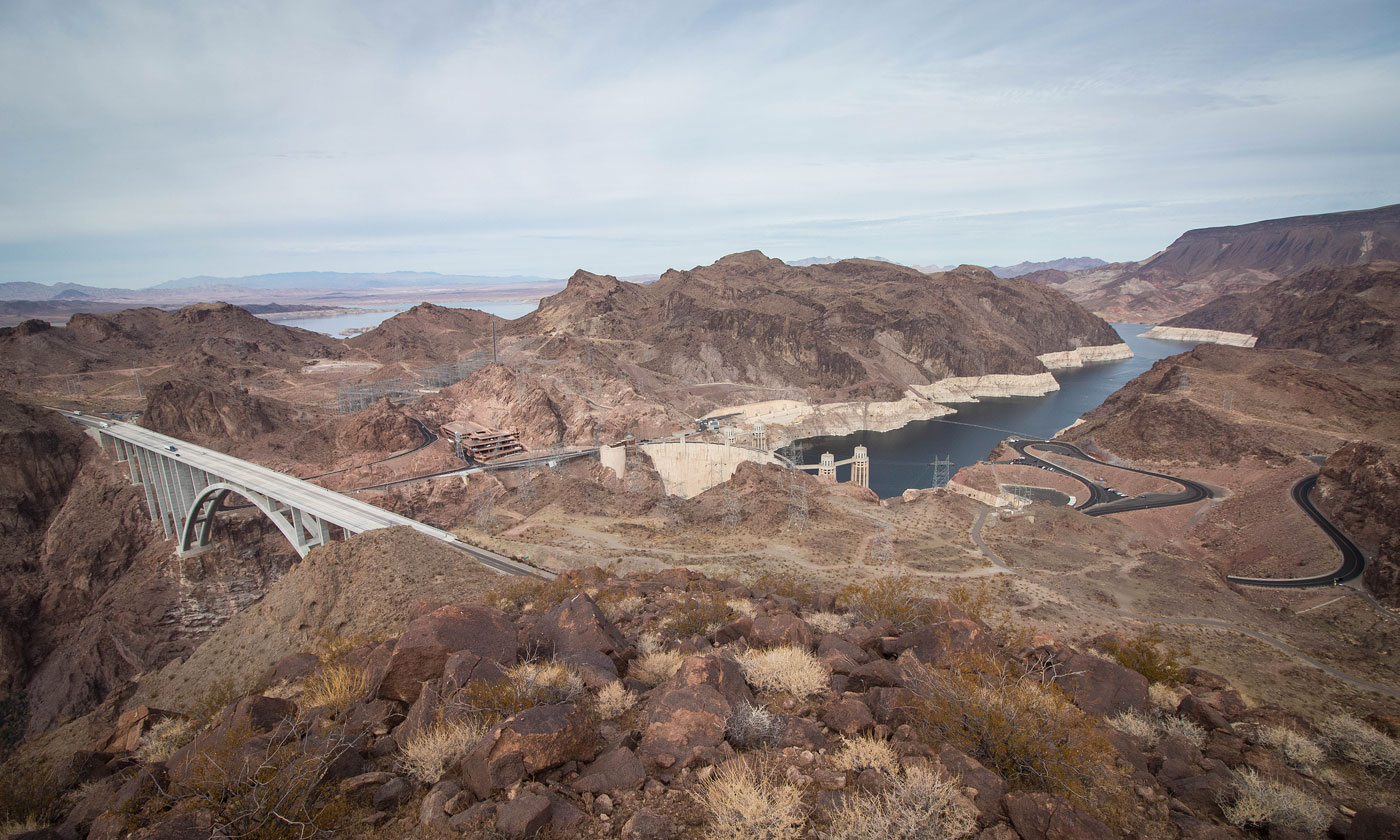
Sugarloaf Mountain summit, view toward the Hoover Dam.
Close-up toward the Hoover Dam.
Looking back up at Sugarloaf Mountain on my descent through the main slope/gully.
Main slope/gully leads back to the wash I left earlier, Class 2+ the hardest move.
Within the wash.
Continuing in the wash leads to Secret Canyon, a technical canyon route. Before the dryfall, there's a route following an obvious social trail (left).
Looking back into the wash as I ascend the social trail. Sugarloaf Mountain visible above.
Heading through the hills on my way to Lone Palm Canyon.
Lone Palm Hot Spring below.
Long Palm Hot Spring waterfall.
Lone Palm Hot Spring.
Farther up Lone Palm Canyon. Years ago, this used to have a stack of sandbags creating a nice pool. It wasn't there on my visit.
I continued up Lone Palm Canyon on the southern side, avoiding the brush within the drainage. This shot is looking back toward Lone Palm Hot Spring.
I continued up Lone Palm Canyon, boulder-hopping, and emerged into this somewhat major wash. Lost Man Peak visible ahead. First, I'd wrap around to the right on a side-drainage.
Within a side drainage to get to River Bend Bridge View Peak (Peak 1540), visible ahead.
Class 2 gully to a Class 3 move.
At the top of a sketchy Class 3 move, looking back down the gully I ascended.
Along the ridge crest to River Bend Bridge View Peak.
Class 3 to gain River Bend Bridge View Peak summit.
River Bend Bridge View Peak summit, view toward Sugarloaf Mountain and the Colorado River.
Along the ridgeline from River Bend Bridge View Peak to Lost Man Peak (left). Justice Peak (Peak 1678) visible top right.
Class 3 fun conglomerate section. Looked hard from below, but was fun and solid.
Looking back along the ridgeline from Lost Man Peak toward River Bend Bridge View Peak. Sugarloaf Mountain visible top right.
Lost Man Peak, view toward Justice Peak (right). I headed down the southern ridge of Lost Man Peak toward Justice Peak.
Along the southern ridge of Lost Man Peak. Fortunately, there was a Class 2 route to get down.
View across Lost Man Wash (right would lead to Lost Man Hot Spring). Liberty Bell Arch visible top left. The ridge I would take to get to Justice Peak visible right of center.
I know. The rock looks dark and a good route seems hard to discern. You can keep the route Class 2 with some care.
Along a grassy-ish ridge. Shortly after the big boulder in the center, the ridge cliffs out. I had to backtrack and drop down to the right into a gully, then re-ascend to the ridge.
After dropping off the ridge, this is a shot looking back the way I came. The ridge is visible on the right in this photo. Lost Man Peak visible top left.
Back on the primary ridge, heading toward Justice Peak.
Class 2 moves just below the Justice Peak summit. On my ascent I used the small caves visible on the right (Class 3/4). Staying on the ridge was easier.
Peak 1667 summit view south toward Liberty Bell Peak.
Back off Justice Peak, I headed north through washes and desert.
Battleship High Point (Peak 1610) visible ahead.
Colorful rock as I ascend Battleship High Point.
Looking back at my progress up Battleship High Point.
Battleship High Point as it got dark. Sugarloaf Mountain visible top right.
Battleship High Point, view the way I came. Justice Peak and Lost Man Peak visible top right.
Hire me or show me some love!
Hire/refer me as a web developer or send me a few bucks if you find my site useful. I’m not sponsored, so all fees are out-of-pocket and my time preparing trip reports is unpaid. I really appreciate it!