

Sun rising on some tarns shortly after leaving the Andrews Lake Trailhead.
Engineer Mountain in the distance as we make our way on the Crater Lake trail.
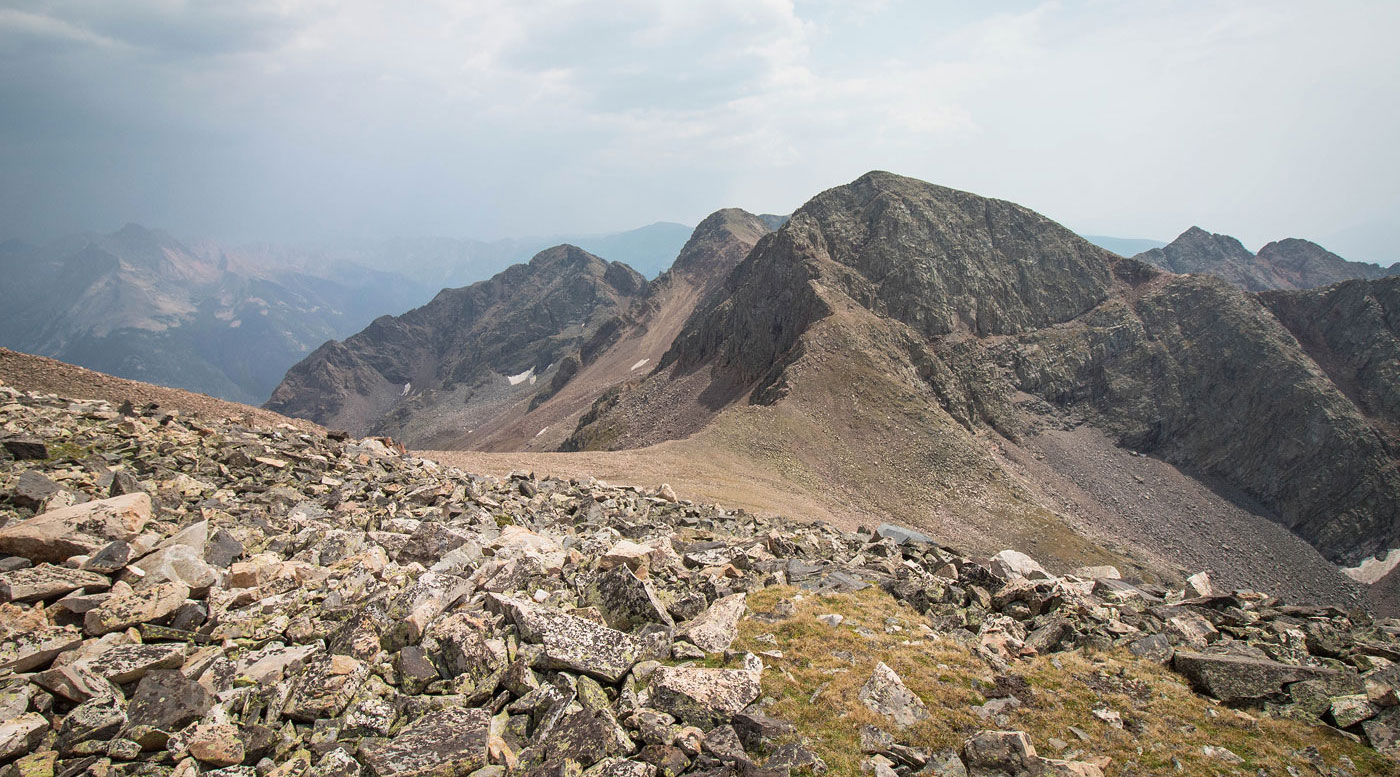
North Twilight Peak comes into view, finally.
Looking back, Potato Hill (left) and Engineer Mountain (right) visible in the distance.
Approaching Crater Lake. For reference, the better descent route (marked in yellow on attached map) from North Twilight Peak can be seen coming from the center in this photo.
Crater Lake, North Twilight Peak behind it.
Along the east side of Crater Lake.
A pretty tarn with Peak 12932 visible in the background. This would be our first peak of the day, but it was still quite far.
Small amount of bushwhacking after the trail disappeared.
Grassy/forest fades into talus. South Twilight Peak is visible on the right, Peak 12932 on the left, and an unnamed point in the center. The saddle we are headed to is the one between South Twilight and the unnamed point. We would first have to drop down almost to the trees visible below before we can ascend the talus slope.
Below near the previously mentioned trees, infinite talus. The saddle we are heading for is visible center.
Looking back at our progress. Our route came from the low spot where Snowdon Peak is poking out in the center.
More talus on the ascent.
Looking back again at our progress.
Lots of big talus at one point.
Getting closer to the saddle, left of center. South Twilight Peak is on the right out of frame.
Looking back the way we came, our route came from the low point on the right of those cool-looking cliffs in the center. You can see the trees we descended to in the center.
At the saddle between South Twilight Peak and the unnamed point on the ridge. West Needle Mountain visible center, and a pretty unnamed lake below it. After doing West Needle Mountain, we would backtrack to this spot. On the top left, you can see Lorenzo. I would say ascending the gully on the left is the best Class 2 option to get over to Peak 12932.
Traversing beneath the cliffs of the unnamed point. Peak 12932 visible left, West Needle Mountain right.
Looking back as we ascend Peak 12932. You can see the cliffs we traversed beneath just right of center.
Class 2 for the first bit up to Peak 12932. Shortly after this point, we encountered a notch obstacle. See map for more detail.
Whether you do the Class 3/4 notch option or drop a bit, both route end up ascending this Class 2 talus slope. Peak 12932 is up there somewhere.
Looking down the Class 2 talus slope. West Needle Mountain visible top.
Summit of Peak 12932.
Heading down the south ridge of Peak 12932. West Needle ahead. You can see the ascent route. Despite how incredibly steep it looks from here, it was only Class 3/3+. The best option is to head for the shadowy section left of center in this photo, as close to the mountain as you can get before starting to the ridge.
On the way to West Needle Mountain, lots of talus. Follow the shadow line in this photo to see the best spot to start ascending.
Class 2+ to get to the ridge before ascending West Needle Mountain.
Looking back at the Class 2 talus. Our route down from Peak 12932 came from the top right somewhere. South Twilight Peak visible on the left.
Class 2/3 u the ridge. Steep and loose.
Looking down toward the ridge we ascended from, and the talus Class 2 that brought us there on the left. It's easy to kick rocks here, so be very careful.
Class 2/3 fun. Multiple route options.
Whiley ascending the fun Class 2/3. The ridge we came up from visible bottom left.
Another show looking back at our progress, Peak 12932 top right, South Twilight top left.
Class 2/3 starts to get more tricky a bit over halfway up. The scramble visible right of center in this photo is likely the crux of the route to West Needle Mountain. It required some Class 3.
Looking back.
The previously mentioned Class 3 section. It was a bit trickier coming down than going up.
Above Continuing up more fun Class 2/3. Some of us kept to the ridge, while others stayed left to avoid additional scrambling. Both options seemed to work fine.
Looking back again at our progress. Peak 12932 on the right, South Twilight in shadow on the left, Twilight in sun behind it.
Approaching a small knife edge ridge. The false summit of West Needle Mountain visible above. Jose is left of center of this photo on a small slab to access the tiny knife edge. Cindy is in the center bypassing the Class 3 ridge by doing a Class 2 workaround.
Close-up of Whiley at the end of the itty knife edge. I feel weird calling it this because it's kind of just a short narrow section of ridge, but whatever. Jose is pulling the Class 3 ridge move. Class 2 workaround on the right. Lorenzo is up top about to reach the false summit.
False summit, headed to the true summit ahead.
West Needle Mountain, view south.
West Needle Mountain, view north toward the false summit and the Weimenuche Wilderness in the distance.
After dropping back down from West Needle Mountain, we headed across the slopes (talus, grass) to the saddle on the far right of this photo. We would then retrace our route beneath the unnamed point (right) to get to the saddle just beneath South Twilight Peak (the dome-looking on in the center).
Traversing the slopes, South Twilight visible on the left.
View back toward West Needle Mountain.
After retracing our route, about to drop back to the saddle we left earlier in the day. South Twilight Peak visible ahead.
Class 2/3 up to South Twilight.
View back the way we came, West Needle Mountain on the right.
Continuing from South Twilight along the pleasant ridge to Twilight Peak.
Looking back toward South Twilight Peak.
Twilight Peak summit.
After starting down Twilight Peak, we were met with what I consider the crux of the route, mostly because it requires some route-finding. We chose to stay high on the right, but not directly on the scary crest. Going down on the left could work, but I'm not sure.
Looking back at a nice ramp/ledge we used to help make the route less scary. We kept just below the ridge crest.
Whiley heading down a Class 3+ option, but keeping on the ridge was Class 2.
Looking back as Jose comes down from the ledge system. The ridge crest is just out of frame on the left.
The ridge came to a drop that ended in a notch. Keep to the right here to get down to the notch below (at the base of the rock ridge in the center). Whiley was route-finding and didn't have luck the way she's going pictured. The better way goes to the right, which took us on a Class 2+ grassy ledge.
Within the notch, descending for a bit. The boulder in the center of the notch marks the exit spot.
The escape spot on the right, followed by a bit of ascending on a Class 2 ramp. Potato Hill visible left, Engineer Mountain farther behind it.
Looking back into the notch as Whiley exits. The ridge we came down from Twilight Peak is visible above.
After ascending the ramp, we came upon nice grassy terrain. North Twilight Peak visible ahead.
Looking back as friends come down the grassy slope.
North Twilight ahead. Class 2. Note the ridge continuing on the right from the summit: that's the recommended descent route. It looks scary from here, but my friends who went that way reported it was only Class 2, mostly with a trail. I recommend going that way. In the center of this photo is the descent route we chose to take, and where later photos will illustrate.
Looking back toward Twilight Peak.
Almost to the summit of North Thunder Peak.
North Thunder Peak summit, view back at the traverse.
Our descent route. I recommend going back a few photos and taking the aforementioned ridge instead. This was a pretty route, but it was tedious.
Class 2 forever as we descend from the saddle. Gorgeous Weimenuche peaks in the distance.
A beautiful little tarn.
Looking back toward the saddle we descended from, Twilight Peak on the left and North Twilight Peak on the right somewhere.
Side-hilling talus/scree to get back to the trail that would lead to Crater Lake.
Hire me or show me some love!
Hire/refer me as a web developer or send me a few bucks if you find my site useful. I’m not sponsored, so all fees are out-of-pocket and my time preparing trip reports is unpaid. I really appreciate it!